Pages

Showing posts with label cheap. Show all posts

Saturday, 3 March 2012

Nail polish haul

So, on my travels to my mum's house, I stopped in H&M and decided that I needed their new mini nail polishes.


You buy a box with three polishes in, and I think there are just the two boxes available. The colours left to right are: Metallic Grey, Metallic Blue, Spark Me Up, Dark Hot Red, Beige, and Pink Me Up

I'll do a swatchfest of these and have them up by the end of the week (hopefully). My nails haven't been in the best shape since the new year. I started playing guitar again, so the nails on my left hand died, and then when I was working with the rifles at work a couple snapped on my right hand, so I'm trying to get them pretty again. Also, the winter hasn't been kind to my skin, so the skin around my nails looks pretty horrific. I'm fine with wearing the colours normally, but when posting swatch pictures, it's kinda embarrassing :/

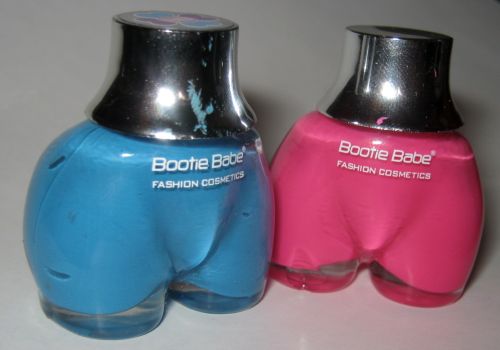
Also! I have my hands on two Bootie Babe Nail Polishes. I ordered three and got an extra one free! I ordered Slinky Pinky (light pastel pink), Hella Baloo (bright primary blue), Lilac Lunatic (soft lilac) and the free one was Brink of Pink (neon pink).


Again, a post will be up hopefully for the end of the week, maybe into next :)

Wednesday, 26 October 2011

Homemade Palette

Depotting eyeshadows.

Now, I don't have MAC palettes, nor do I have Z palettes or Uni ones. What I do have however is a pencil tin from the poundshop that I have turned into my perfect palette for depotted eyeshadows.


This is a pencil tin that I bought from Pound World in my town, it came with 12 pencils (which I needed anyway). Magnets are attracted to the metal, so don't worry.


As you can see, it opens up nicely, has quite a lot of space for shadows to go in


The next step is to get hold of magnetic photo paper. Again, I got two sheets of magnetic paper from Pound World.
(Yes, you can see my lava lamp~)


Cut the magnetic paper into shapes that will fit on the back of your eyeshadow pan. As you can see here, that black square will fit nicely onto the back of that pan


Using superglue (I used some cheap glue from Wilkinsons), adhere the magnet on to the back of the pan. Magnetic paper will come with a black side and a white side. Make sure that you apply the glue to the white side.


Stick your pans in to the new palette!


The whole project cost me under £2.50, the pencil tin and magnetic paper were £1 each, and I have a feeling that the glue I used was ridiculously cheap, something like 17p. It's easy, cheap, and I find it fun organising the colours when they're all snug in the pan!

I have three of these palettes now, one that holds MUA colours, another that holds Colourworks shadows, and this one that holds random shadows that came in far too bulky packaging.

Pros of doing this mean that I can take a lot more eyeshadow colours with me when I travel, as they're all in one place, also, I can put the shadows in different tins, so all the colours I need will be in one tin. It's a lot easier than hauling around a bag full of loose eyeshadow palettes like the rather large Maybelline single eyeshadows.
Also! If you don't like the fact that people will see that you've got a 'palette' from a pencil tin, you can easily customise your tin with the sticky back plastic you can get from stationery stores. The plastic comes in all different kinds of designs and colours, so you'll be stuck for choice!

Thursday, 13 October 2011

MUA Eyeshadows

I bought 2 new MUA eyeshadows a week ago, and I thought I'd share pictures of swatches of all the shadows I currently own (I'm going into town tomorrow to pick up some more and a few nail polishes, AND pretty much all of the I Love... Chocolate and Oranges range).

Unfortunately, I depotted them all into a tin before taking photos; it never crossed my mind that I should photo before swatching that day! Nevermind! I have a photo that I took a few months ago when I bought my first round of the shadows, and the packaging is still exactly the same.


Plain black casing with a clear plastic lid. The shadows aren't hard to open, so your nails will be intact after opening. They're also sturdy as I was able to do a whole move across the country without them shattering.


Back of the packaging. Each pan holds 2g worth of product, so £1 for 2g, deal right?


These are the swatches done in my room, under tungsten lighting, and all of the shadows are of the pearl texture. I think that number 26 is the wrong number, so we'll call it 2? from here on.


Shade 3: A pearl finish, it looks like tin foil when swatched on your hand. It's very smooth, almost creamy, and has pretty good pay off
Shade 9: A duochrome. The base colour is very pink, as you can see in the photo, but it flashes between blue and pinky purple. Needs to be built up though to work well
Shade 14: A darkened forest green. Soft, and better colour pay off than shade 9. Is a pearl finish
Shade 11: Metallic golden brown. This colour is gorgeous, kind of reminds me of Urban Decay's Toasted; maybe not so much in photos, but in person, yes.
Shade 12: Possibly the most talked about MUA shadow. This is the dupe for MAC's Club. Reddish brown base with a green duochrome, which you can just about see here. I love this colour, it's the ultimate 2 colours in one. Smokey eyes are effortless with this colour... Just be careful you don't end up looking bruised with all the red and brown.
Shade 13: Dark Royal Purple. I want to love this colour so much, and in the photos it's easy to see, but look, the pay off is bad. This swatch was done on top of Too Faced Shadow Insurance, and it was still patchy. I tried it on top of coloured bases too, and it's still patchtastic; and not in the good way.
Shade 2?: Golden Rose colour. Starts off sheer, when I swatched it initially, I thought I had finally come across a bad MUA pearl shadow. Naw, not by a long shot. It swatches beautifully, smooth. It's a pretty rose-y colour, and it makes me think of the transition from summer to fall when you don't want to darken it up, and you still want to cling to the roses/corals of summer.


All of these shadows are in Superdrug stores around the country, retailing at £1 each.

All purchased by me, with money that is my own :)

Tuesday, 11 October 2011

Khaki Force and a Raindrop

On my way home from uni I popped into my local Superdrug and picked up these.


Two Miss Sporty Lasting Nail Colours, in Raindrop, and Khaki Force.

These are two excellent fall/autumn colours; they come in the standard Miss Sporty rounded glass bottle, and are small enough to throw in your bag and for you to lose it in there.

Raindrop is a blackened blue heavy teal colour, which I am in love with, ever since swatching. The drawback with this colour is that the formula of the polish is actually very watery, and it takes around 3 coats for the colour to be fully opaque. Think dupe of OCC's Echo

Khaki Force is a yellow heavy khaki colour (funnily enough :P), and after one coat the colour is pretty gross. Ever seen baby poop? Yeah, it's that colour after one coat, but after two and three coats, it's a much nicer darkish yellow green. The formula is a little less watery.

I don't know the wear of these just yet, as I only bought them two days ago, and I have just put a fresh coat of Raindrop on my nails, but as soon as I know, I'll update this post.

Courtsey of my little nail swatch wheel thing, here are swatches of Khaki Force and Raindrop!


Here they're shown as they are after normal application. My favourite way to wear these though is with a matte top coat; I use Claire's matte top coat (£2.25), because I'm cheap like that. My camera subsequently died as I wrote that, so I can't post pictures right now of the polishes with the top coat; sorry!


Nail Polishes can be bought from Miss Sporty website or Superdrug stores. The polishes cost £1.99.

Purchased with my own money, from Superdrug.